-
Notifications
You must be signed in to change notification settings - Fork 11
Using Pose Libraries
Note: this page assumes you are in a blend file where the rig is linked or appended. If the rig is linked, then the "thumbnail creation tools" will be greyed out, but they should only be needed for pose setup anyways.
- Select a character rig (armature) in the 3D view.
- Go into pose mode.
- Go to properties > armature tab (icon with the T-pose figure).
- Scroll down to the Pose Library panel, click on the black triangle to expand if it's collapsed (which is default).

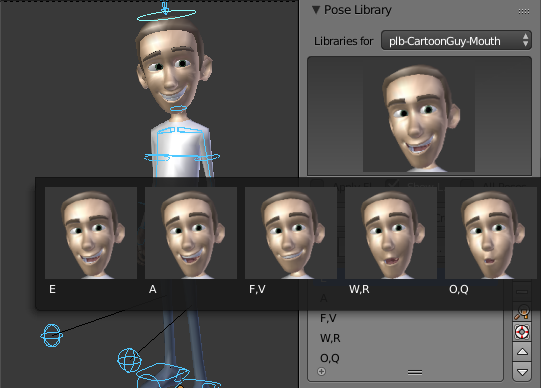
How the panel can look if you have already added poses and thumbnails.
- Go to the pose library panel (steps above).
- Click on the dropdown field next to "Libraries for..." above the panel.
- Select whatever library you want.

Are you not seeing any items in this dropdown? Then the pose library actions may not be loaded in the blender file, or none have been created.
You can load a pose library from another blend file by linking or appending it. For reusable libraries, linking is a powerful method.
- Go to file > Link.
- Navigate to the source blend file of the rig.
- Click on the blend file, and then into the actions subfolder.
- Select all the actions you want to link, and press Link top right.
- Now they should be in the blend file.
No actions folder? Then, there appears to not be any pose library saved in this file.
No pose libraries appear in the dropdown in the pose library panel? Then most likely the libraries are not named correctly. The other thing you can check is that your rig (or proxied rig) object has a name matching the source library character. For example, when you proxy a rig, it will append the name _proxy to the rig object, which would be interpreted as part of the character name used to filter for library names associated with the character.
-
Select all bones of your rig.
- It does matter what is visible in the interface, so enable all relevant layers and unhide bones as appropriate.
- Alternatively, if you only want to apply the position of a single bone of a pose, you could just have that single bone selected.
-
Go into the pose library panel.
-
Apply the pose by either method below:
-
Click on the pose gallery viewer, from the popup select the pose you want to apply

Note: If you hold the shift key at the moment of clicking on one of the popup faces, you'll get a mixing slider to blend between the current pose and the new one you are selecting!
-
Select by left-clicking the name of the pose in the UI list below the icon viewer (the row will become highlighted), then press the magnifying glass icon.

-
-
Now you should see your character immediately snap to that position in the viewport; if auto-keyframing is enabled, the moved bones will be keyframed
- Be aware of this if you are trying out multiple poses, in case not all bones are recorded in all poses!
- It will only add keyframes to bones that are saved to the pose itself, regardless of whether that bone moved or not.
Exact same steps as above, except this time be sure to only select the bones of your character that you want to have affected. E.g. if a pose contains a position for the spine and legs, but you apply a pose with only the legs selected, the spine will not be moved - only the legs.
Press and hold shift when you click on the popup pose, then move the slider to the desired mix, hitting apply or pressing enter when complete.

The Pose Thumbnails add-on is brought to you by: Jasper M. van Nieuwenhuizen, Sybren A. Stüvel & Patrick W. Crawford