-
Notifications
You must be signed in to change notification settings - Fork 23
Recording Problem‐Solving Behavior
This page continues the tutorial for building a very simple math tutor by introducing the Behavior Graph.
- Behavior Graph Overview
- Set start state
- Defining strategies
- Anticipate common student errors
- Tutor-performed actions (for dynamic interfaces)
The Behavior Graph is used to define the inner loop (step loop). That is, it provides step-level guidance within each problem, including step-level correctness feedback, on-demand hints, error-specific feedback messages, and assessment of knowledge based on Bayesian Knowledge tracing.
Here's a list of the possible features in a behavior graph (we will only be covering a few, but feel free to read the documentation to get in-depth knowledge):
- Minimal feedback on steps - classified as correct, incorrect, or suboptimal
- Immediate feedback
- On-demand feedback
- No feedback (quiz mode)
- Error-specific feedback
- Success messages on correct steps
- Student-requested hints on the next step (different policies for selecting hints are supported)
- Assessment of knowledge (i.e., maintaining a student model that captures probabilities of mastery of the knowledge components (KCs) targeted in the instruction, updated by Bayesian Knowledge Tracing)
- Skill meter (i.e., an open learner model showing mastery of KCs)
- Multiple solution paths within a problem (major and minor strategy/notational variations)
- Dynamic interfaces (i.e., interfaces that can change, under control of the tutor, as a function of the problem state)
- Collaborative tutors for synchronous, networked collaborative problem solving, with roles and embedded collaboration scripts tied to the problem state- Backward fading of worked examples- Input substitution (tutor can replace correct student input with canonical/evaluated form, corrections, etc.)
You may want to watch the following video about how to define a problem in a behavior graph before reading about it below: $ How to create a new problem.mp4
The tutor interface is designed to capture specific problem-solving behavior, but the starting information may vary for each problem. Note that the tutor interface only contains information that is shared among all problems of the given type. It contains no problem-specific information, so it is reusable across problems.
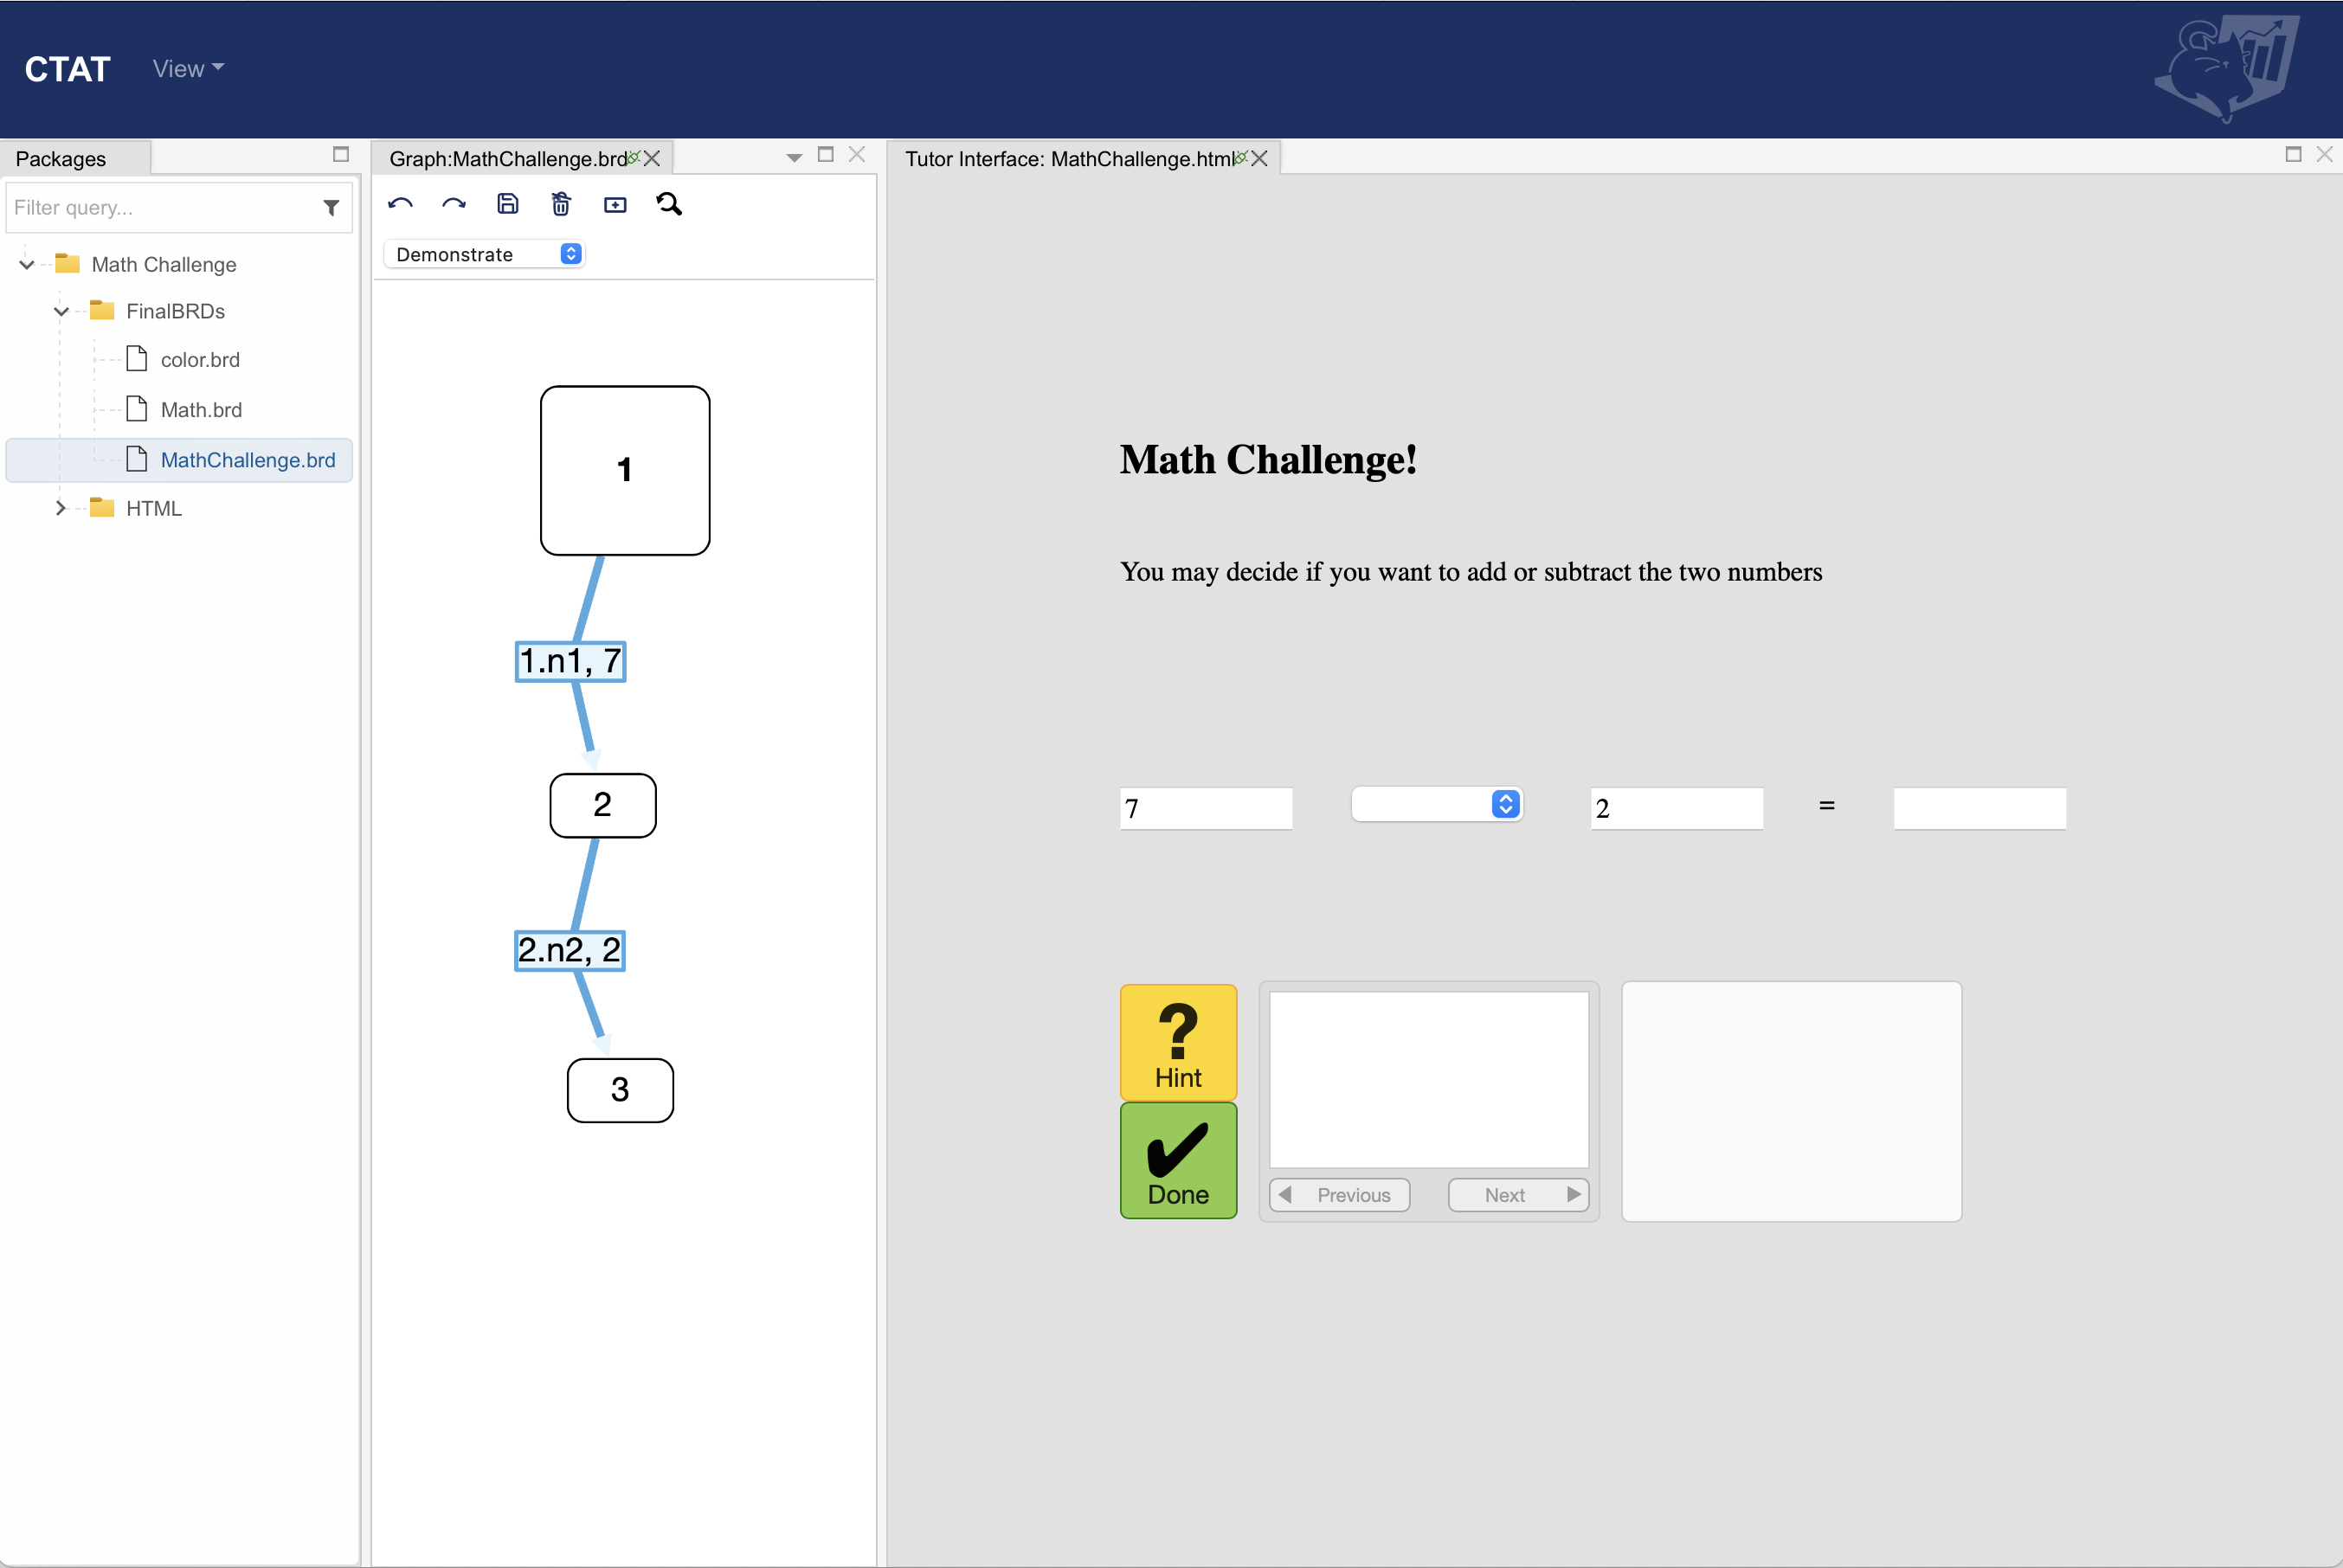
The problem-specific information is stored in the start state. It is important to follow this general principle when creating an interface. One use case might be when you want to give students partially worked examples before they do full problem-solving (you wouldn't want to design separate interfaces for each exercise). To handle this, you can set a start state in the tutor. Essentially, you do some initial data entry, which is shown to the student as pre-filled data at the starting for each problem of that type.
For example, in the Math Challenge student interface, you might enter the values for the two given numbers as initial values before students start the problem.
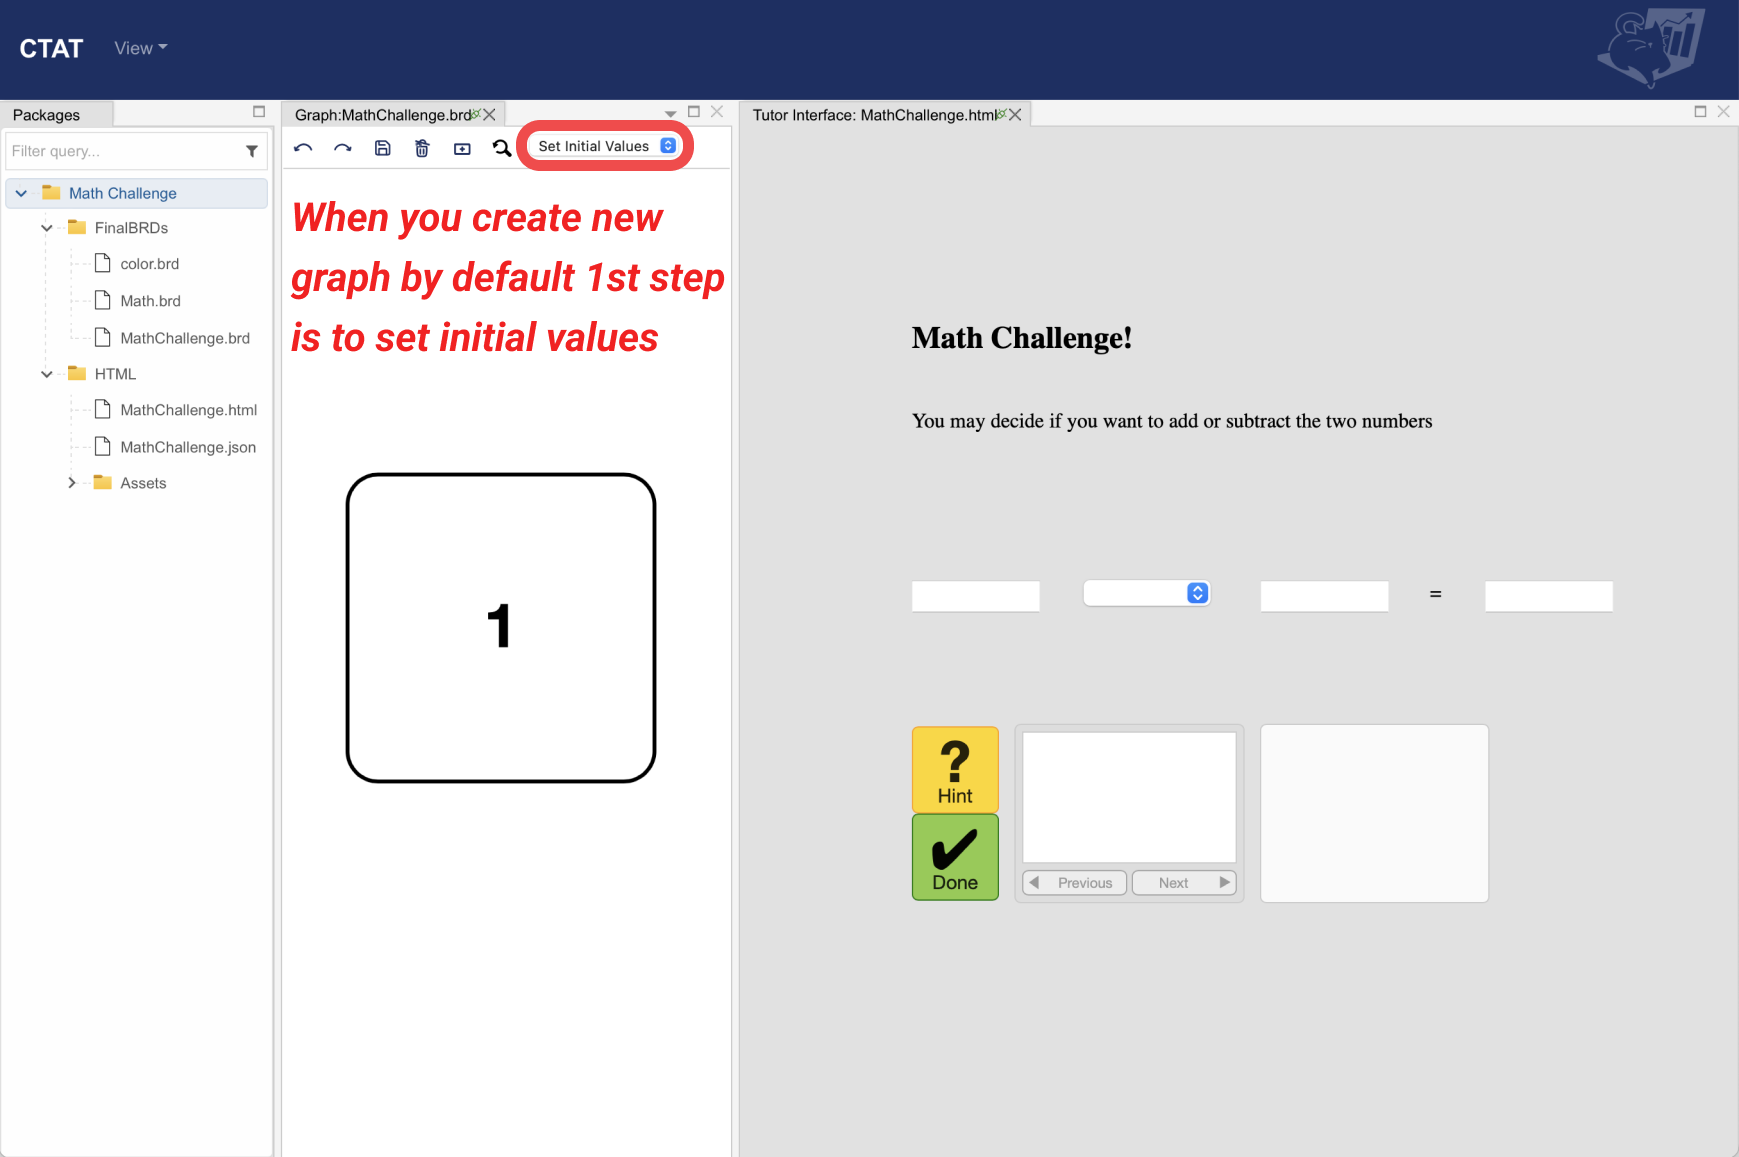
Authoring a single problem is done by demonstrating (performing) problem-solving actions. During this phase of authoring, you will commonly have the graph showing in CTAT along with a student interface with which you'll interact.
The Author Mode in CTAT switches to Demonstrate after you create your start state. You should demonstrate correct and alternate answers that students might make for this problem. CTAT's behavior recorder will record the demonstrated behavior in the form of a "behavior graph".
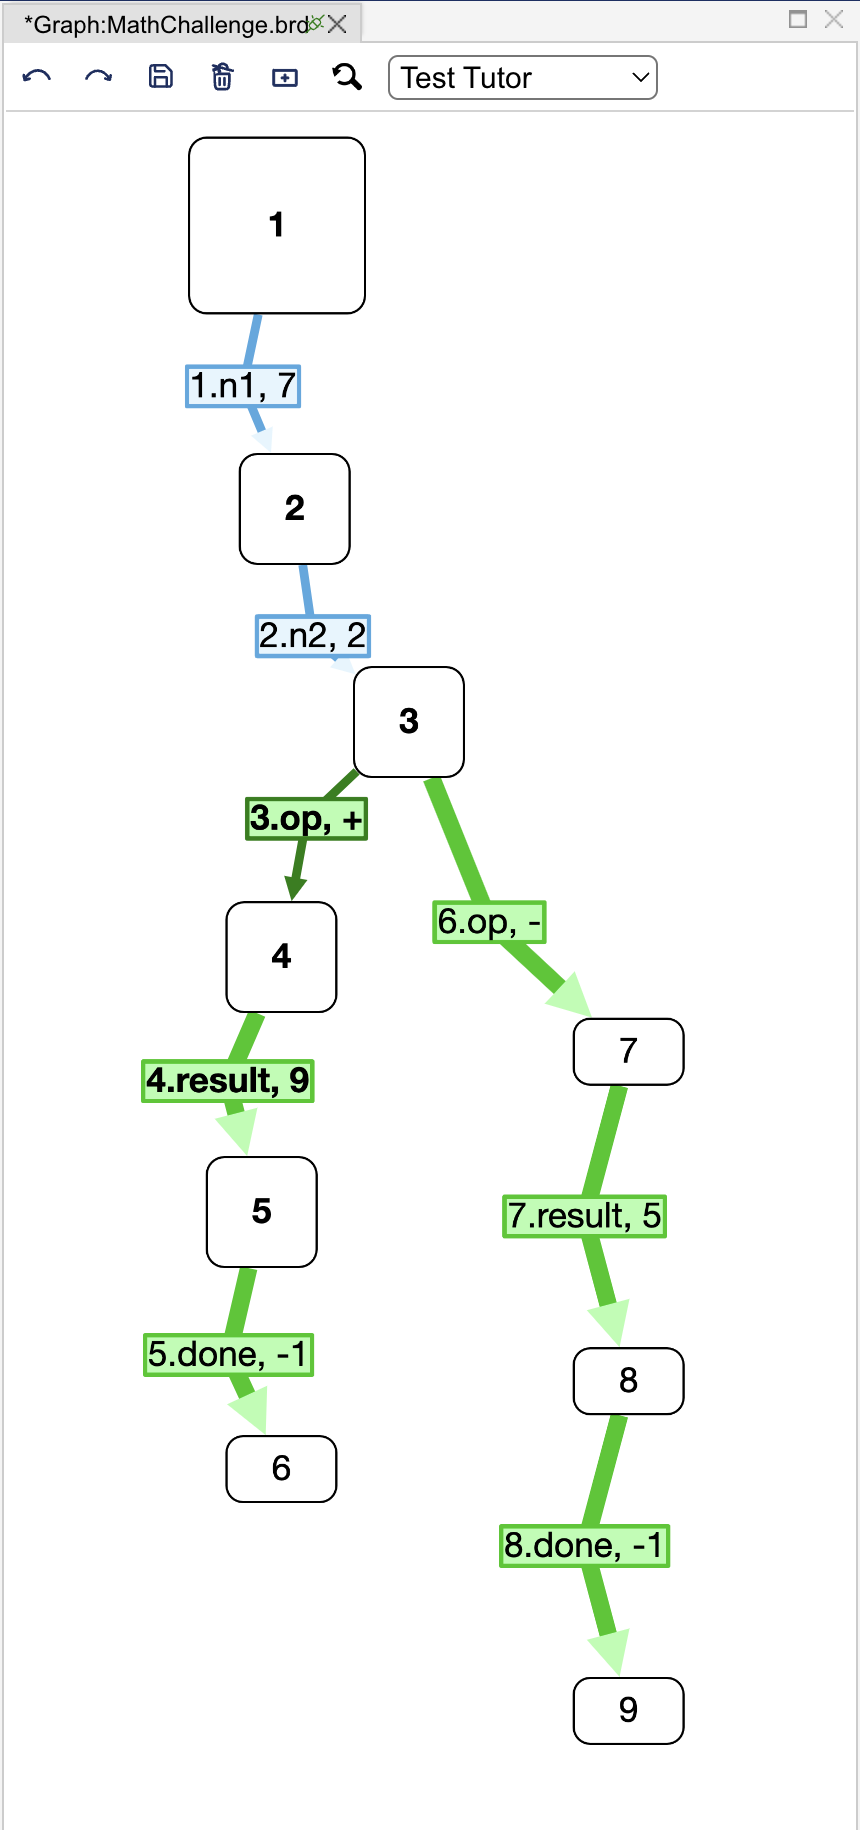
The behavior recorder records each demonstrated step as a 'link'—the line connecting two nodes—in its graph. In the graph, actions are represented by links, while states are represented by nodes.
Each student’s action in a tutor is encoded into an SAI by the component and passed to the tracer for grading. An example-tracing tutor's tracer searches the behavior graph for links whose SAIs match the student's SAI, in order to determine whether the student's step is on a path to a solution.
An SAI is a generalized means to describe a user action on a GUI encoded as a 3-element ordered pair (selection, action, input). Its elements:
- S = selection: a unique identifier for the interactive component, from the id attribute of the HTML element- A = action: a verb describing the action taken, often corresponding to a method name on the component instance; e.g. UpdateTextField for a text component- I = input: the object of the action; for a text field, what you typed; for a radio button group, the individual button clicked Using the Math Challenge problem as an example, the student can either select “+” or “-” for the first step. We will define each scenario one by one. Let’s start by selecting “+” from the dropdown. By default, the actions you perform in the interface are recorded as correct answers in the behavior graph.
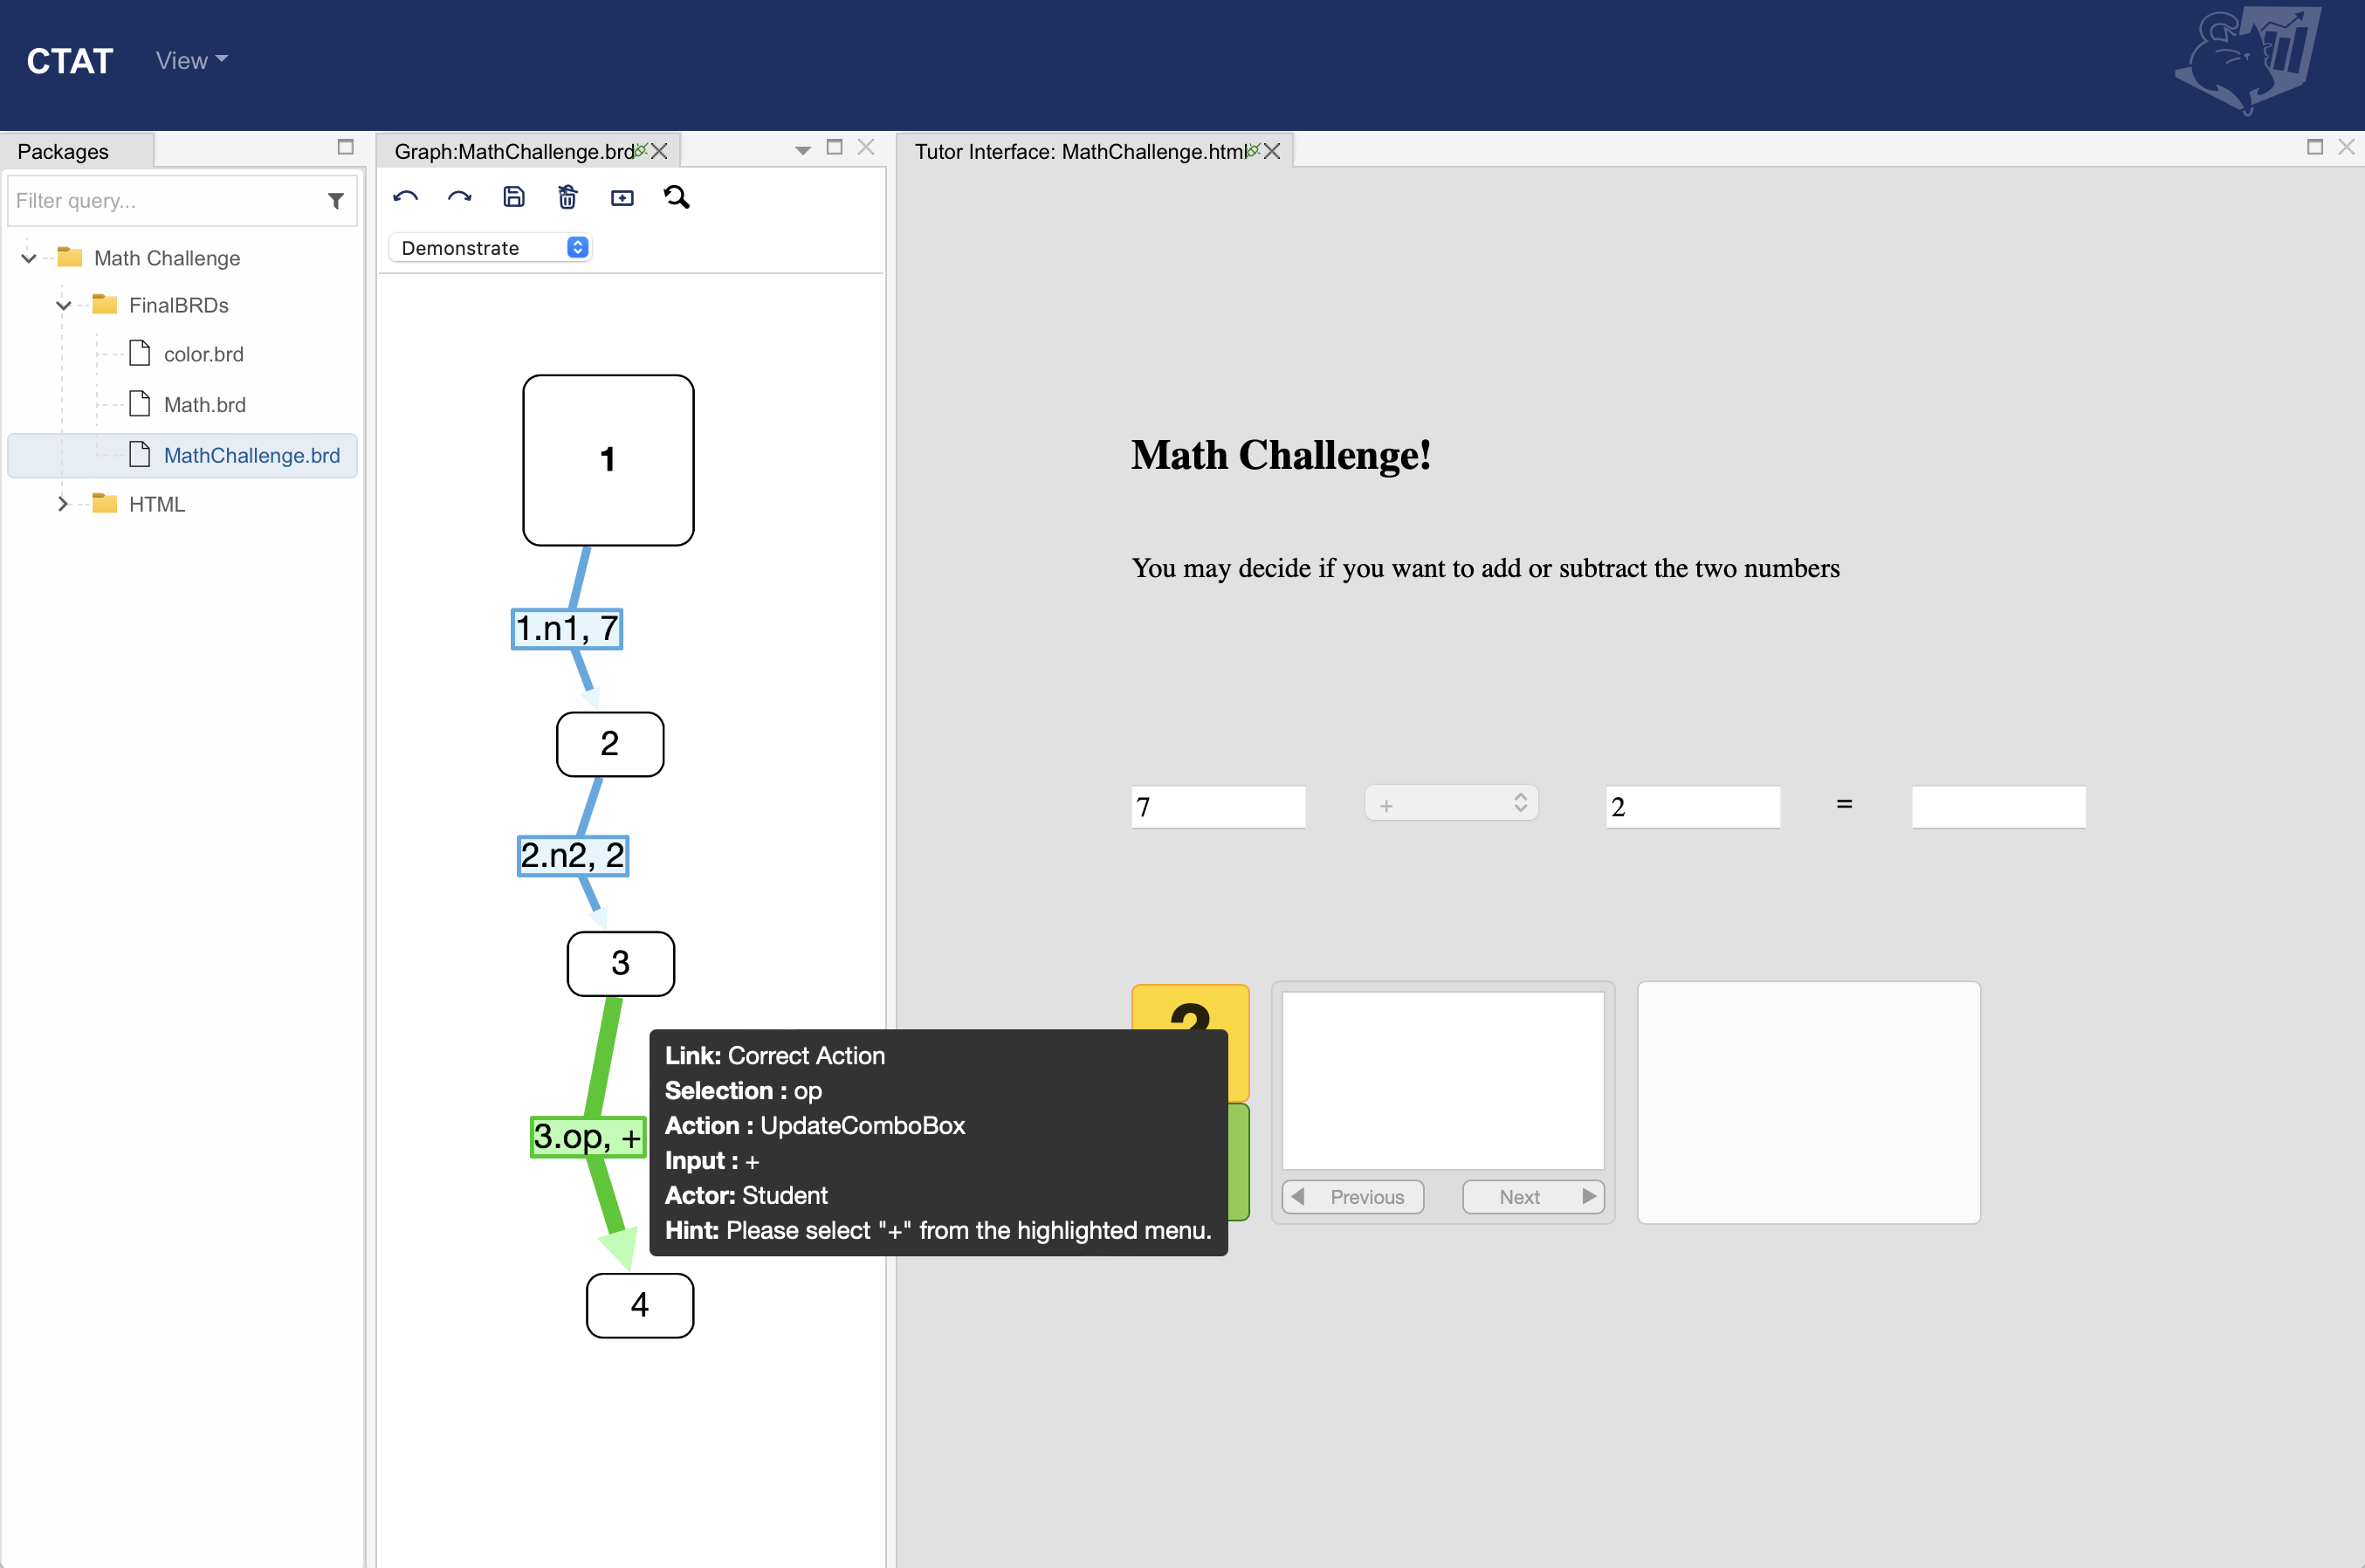
The color of the text on the label indicates the link type (e.g., correct steps have green text, while incorrect steps have red text). Hovering over an action label displays a tooltip showing details of the link:
- Link: Correct Action (action type)- Selection: op (ID of interface element CTATComboBox)- Action: UpdateComboBox (method name for CTATComboBox)- Input: + (input for CTATComboBox)- Actor: Student (who is responsible for this action)- Hint: Please select "+" from the highlighted menu. (default hint telling the student what is the correct next action) For the next step, you will perform the addition and enter 9. On doing that, a link storing that step extends the behavior graph further. Once you are done with the problem, you should always click on the Done button to let the tutor know that you have completed the problem.
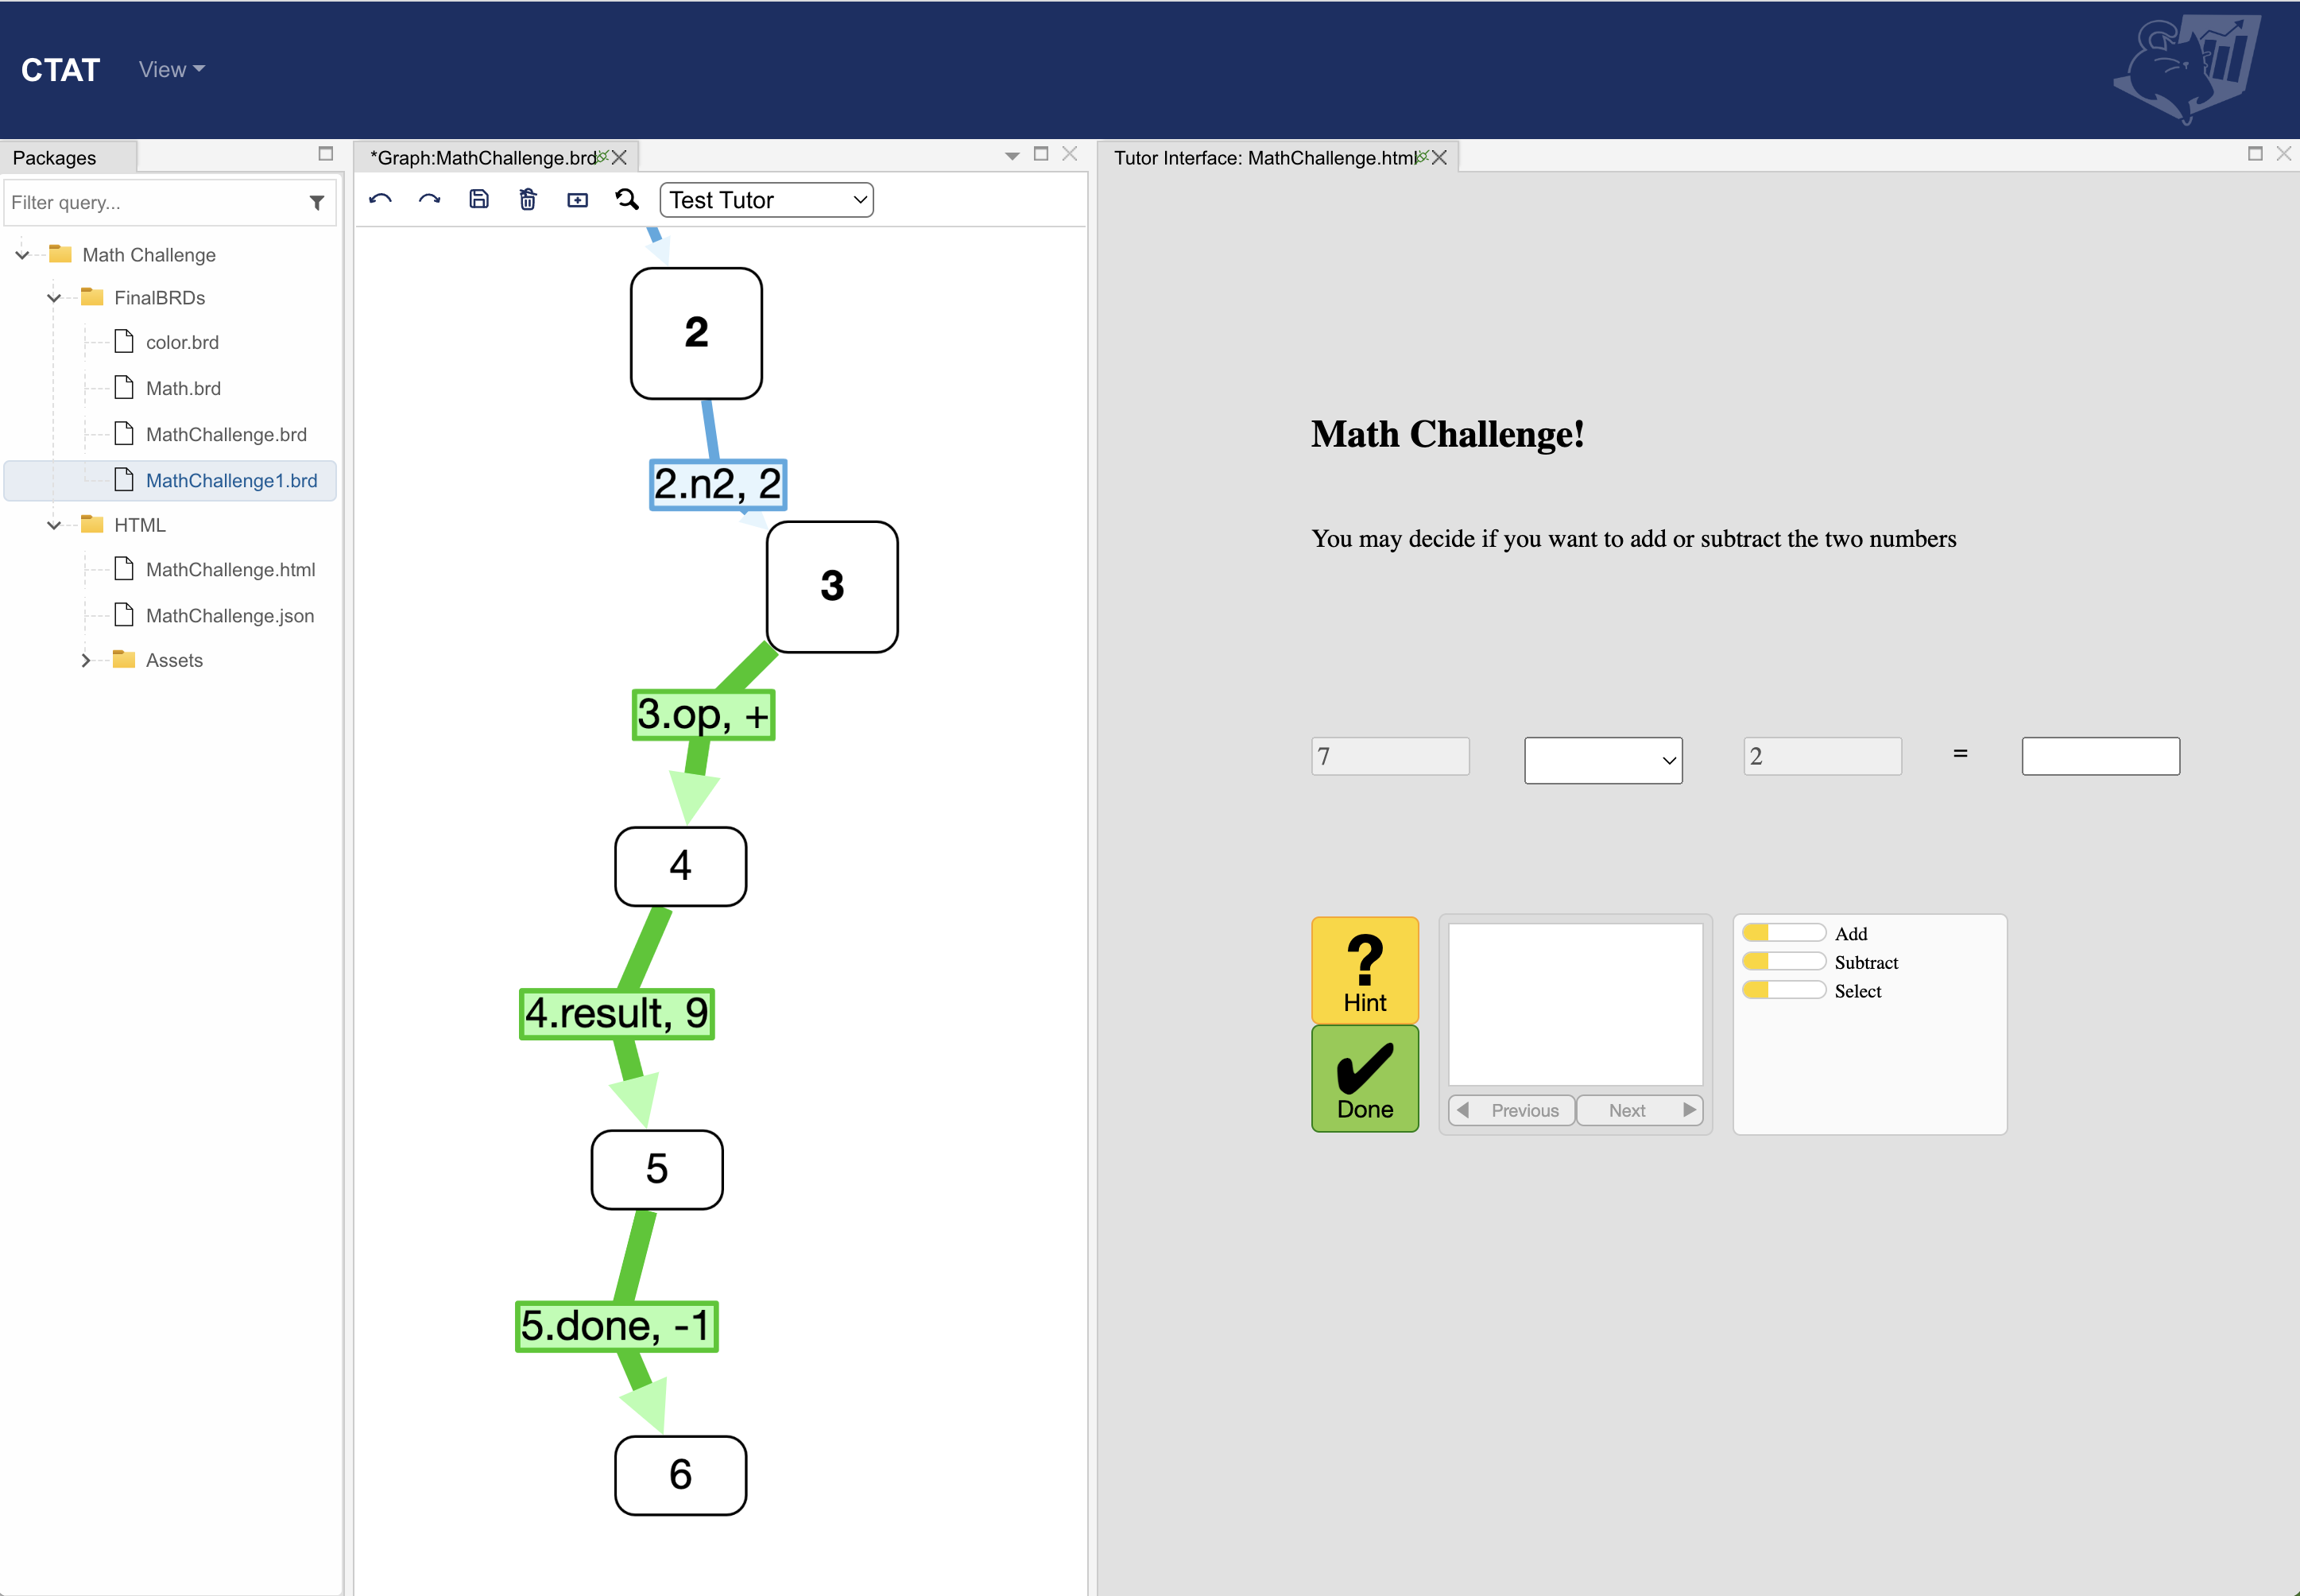
You can take a look at how to demonstrate the incorrect solution path here: How to add an incorrect solution path.mp4
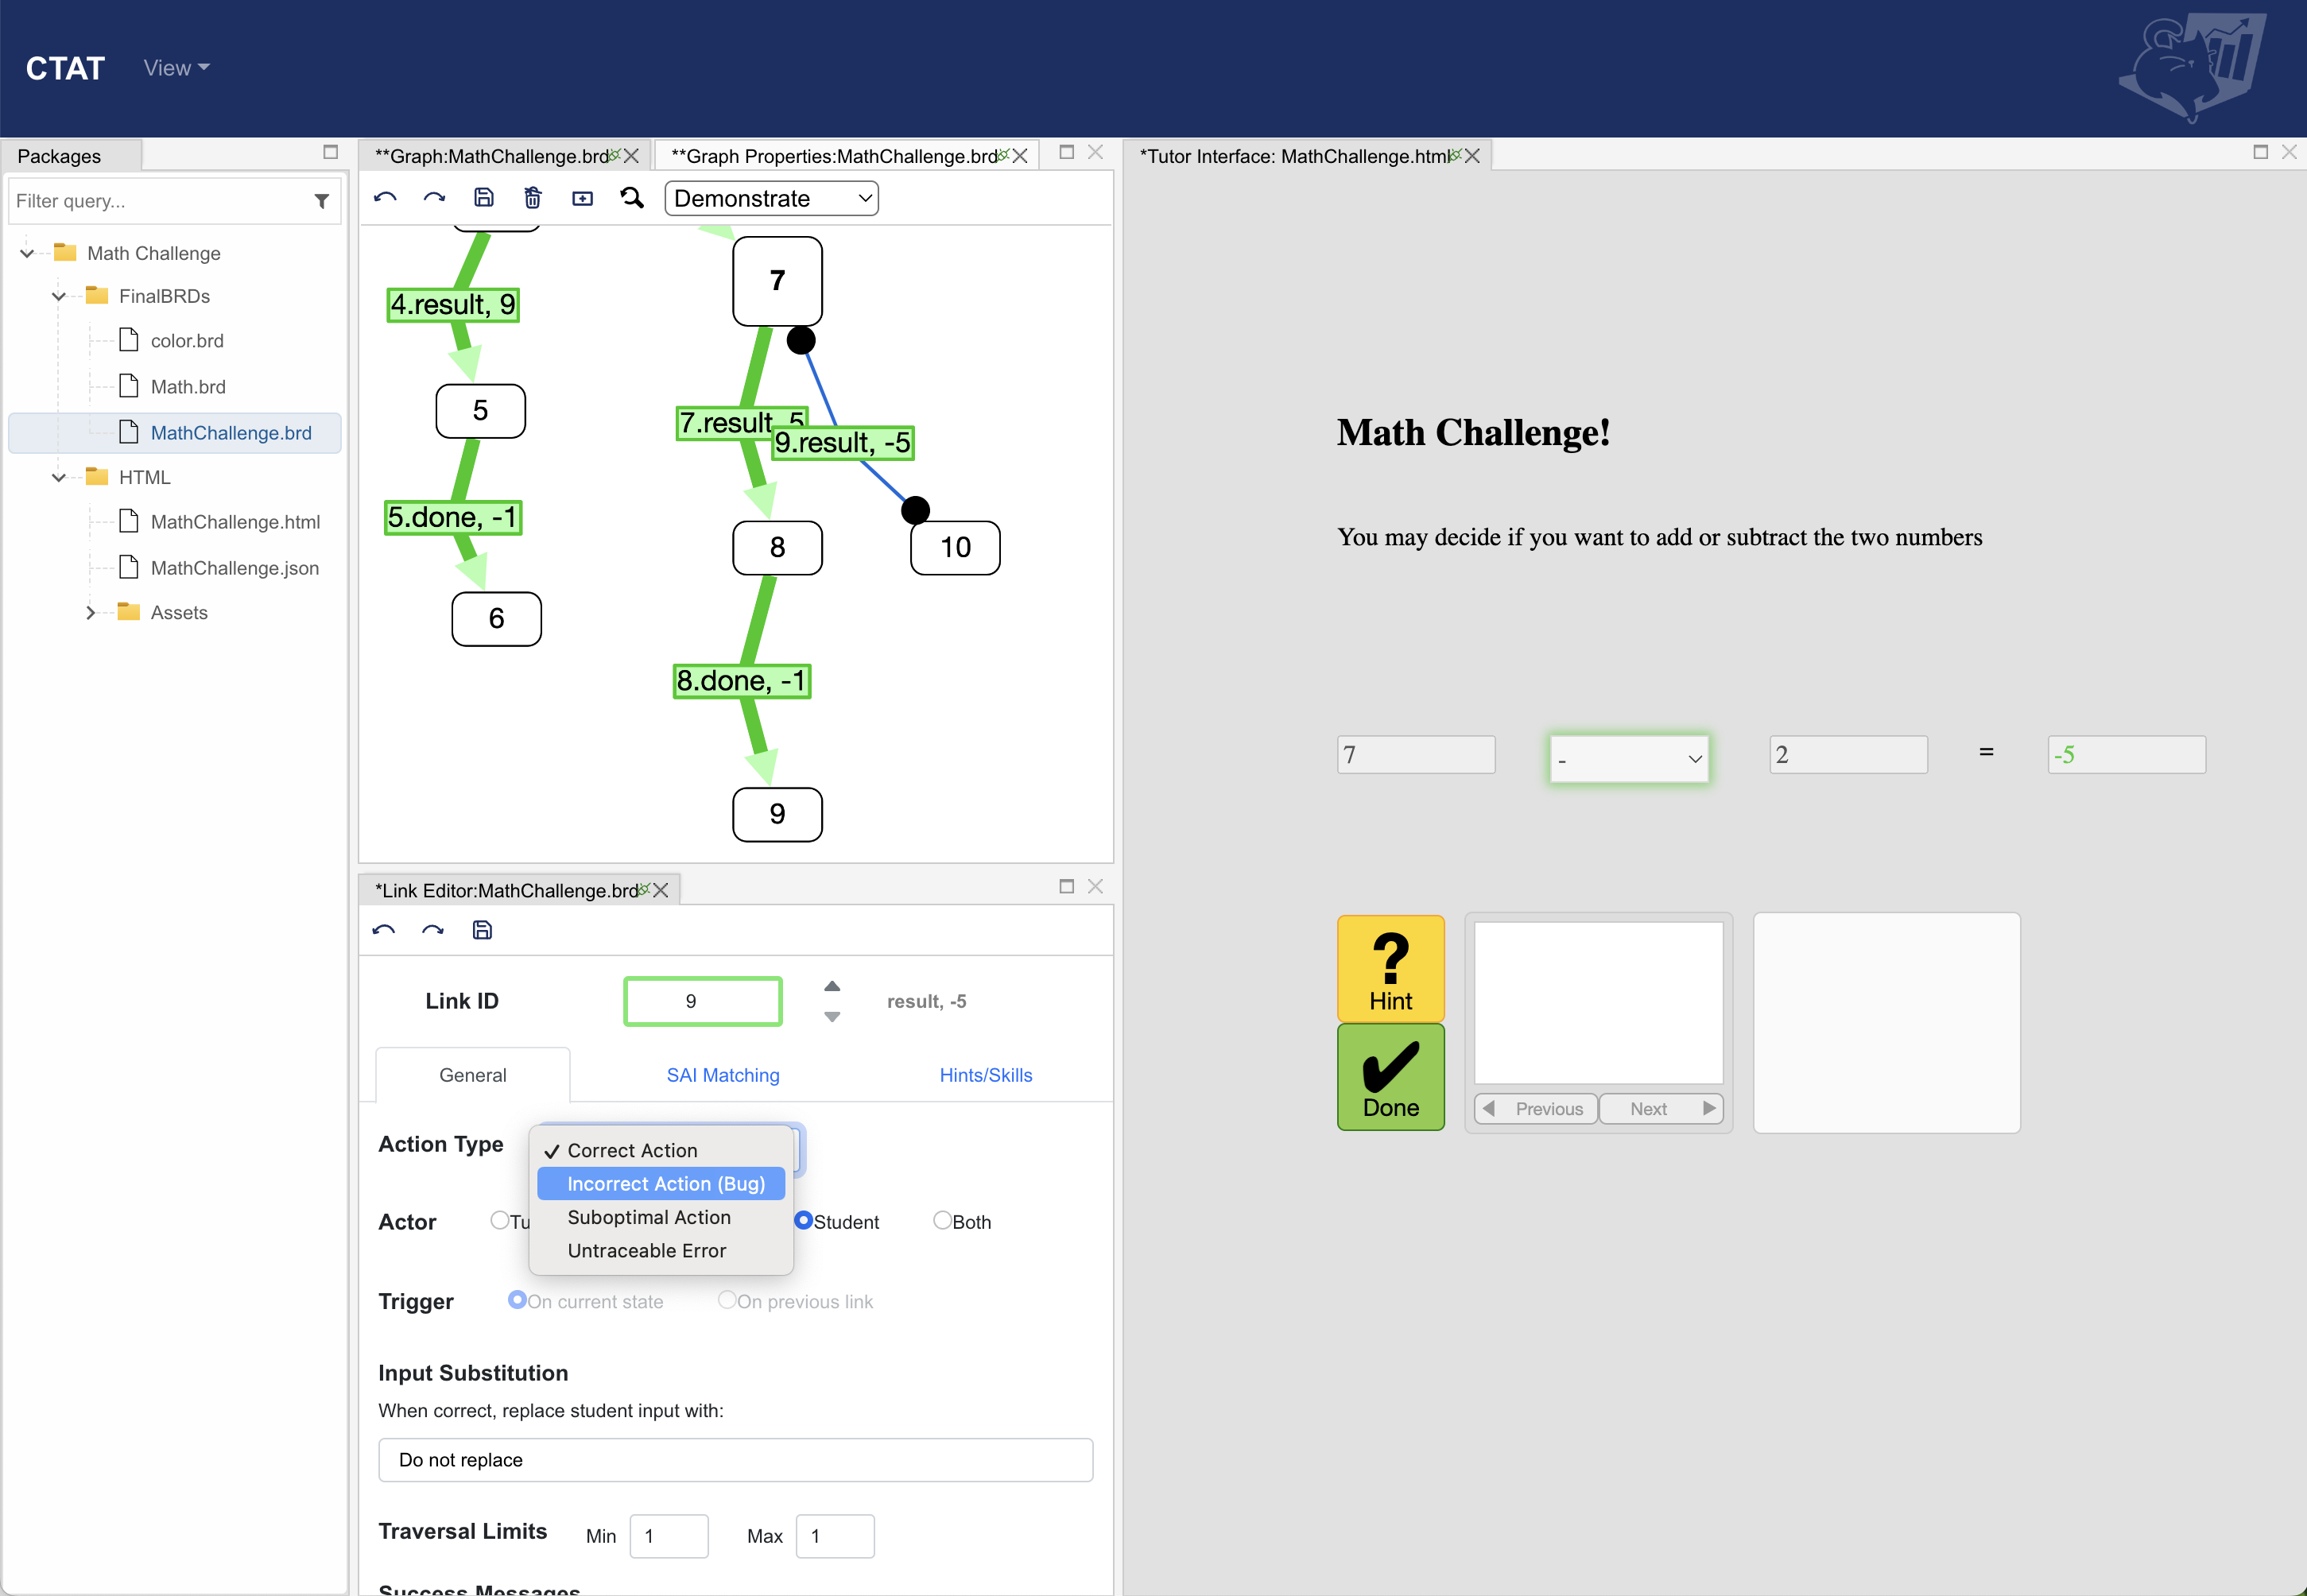
A link can represent one of four different action types: "correct action", "incorrect action (bug)", "suboptimal action", and "untraceable error". We will focus on correct and incorrect actions here.
Correct Action: A preferred, correct action. This type of link is traversed when matched with a student's action. A correct action link can have feedback associated with it that is displayed to the student when the link is matched; it can also have a variable number of hints that are displayed sequentially when the student requests a hint. Visual feedback to the student is commonly a green outline or green text on the component specified as the selection of the correct action.
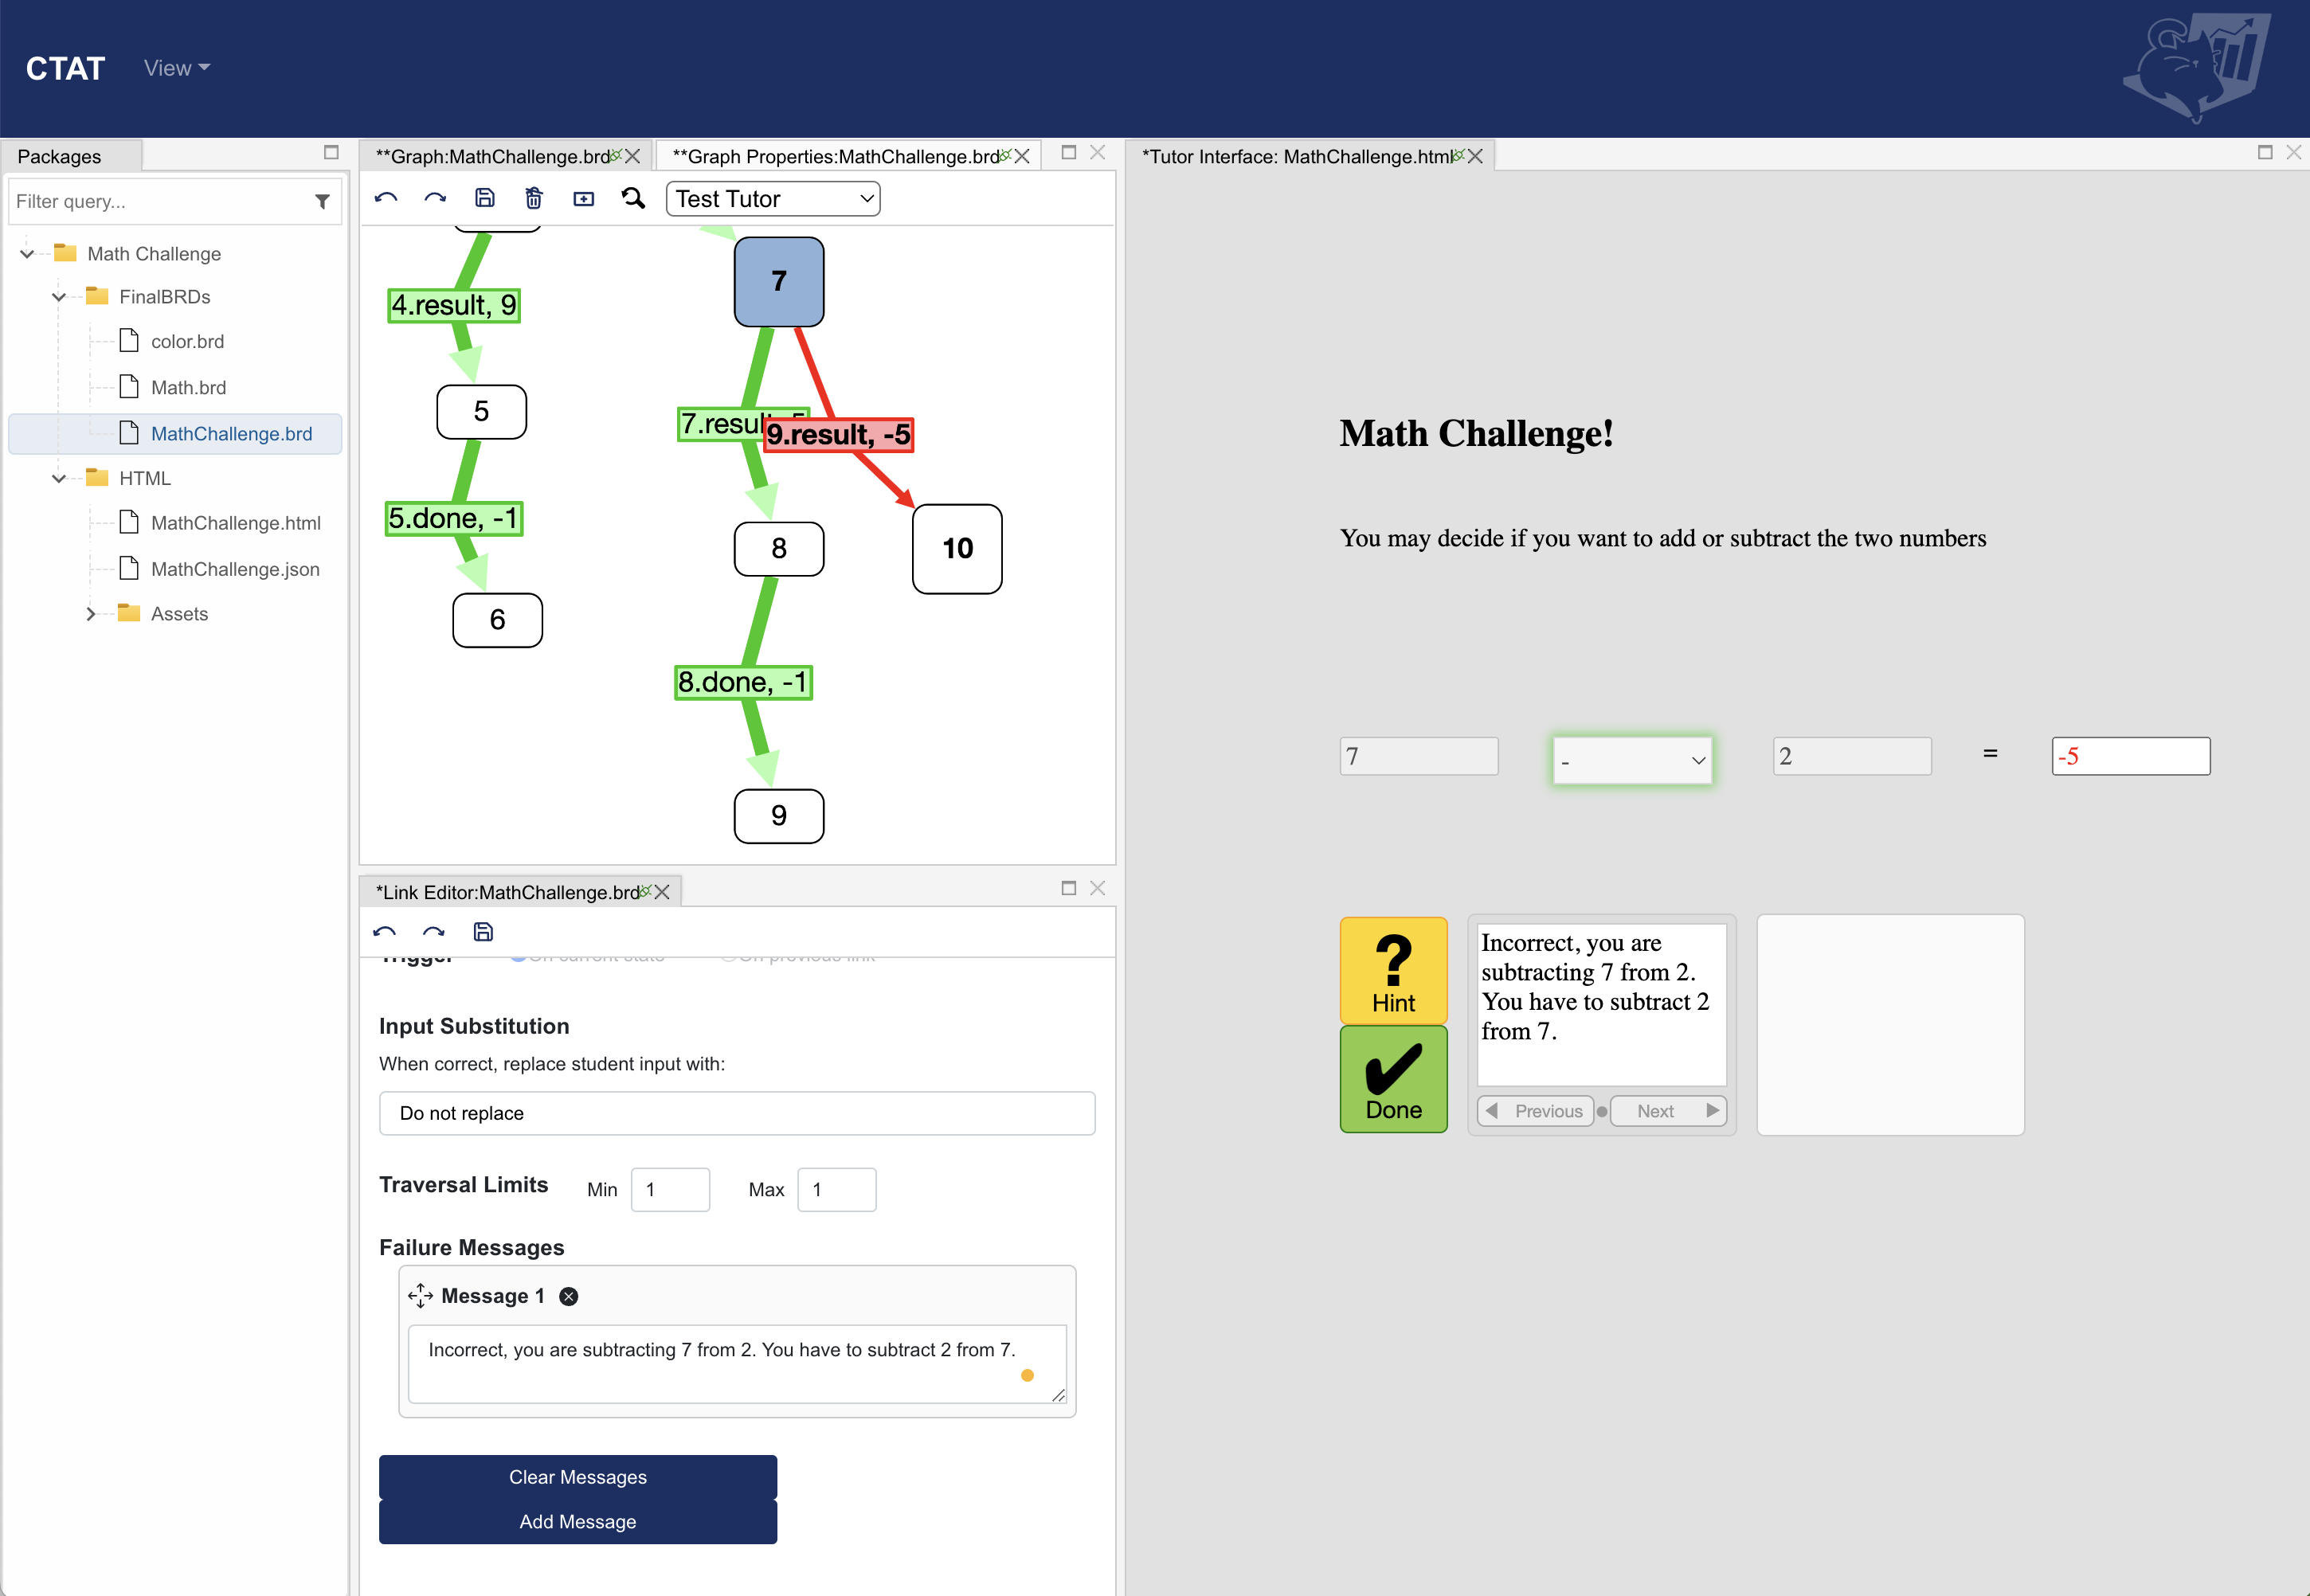
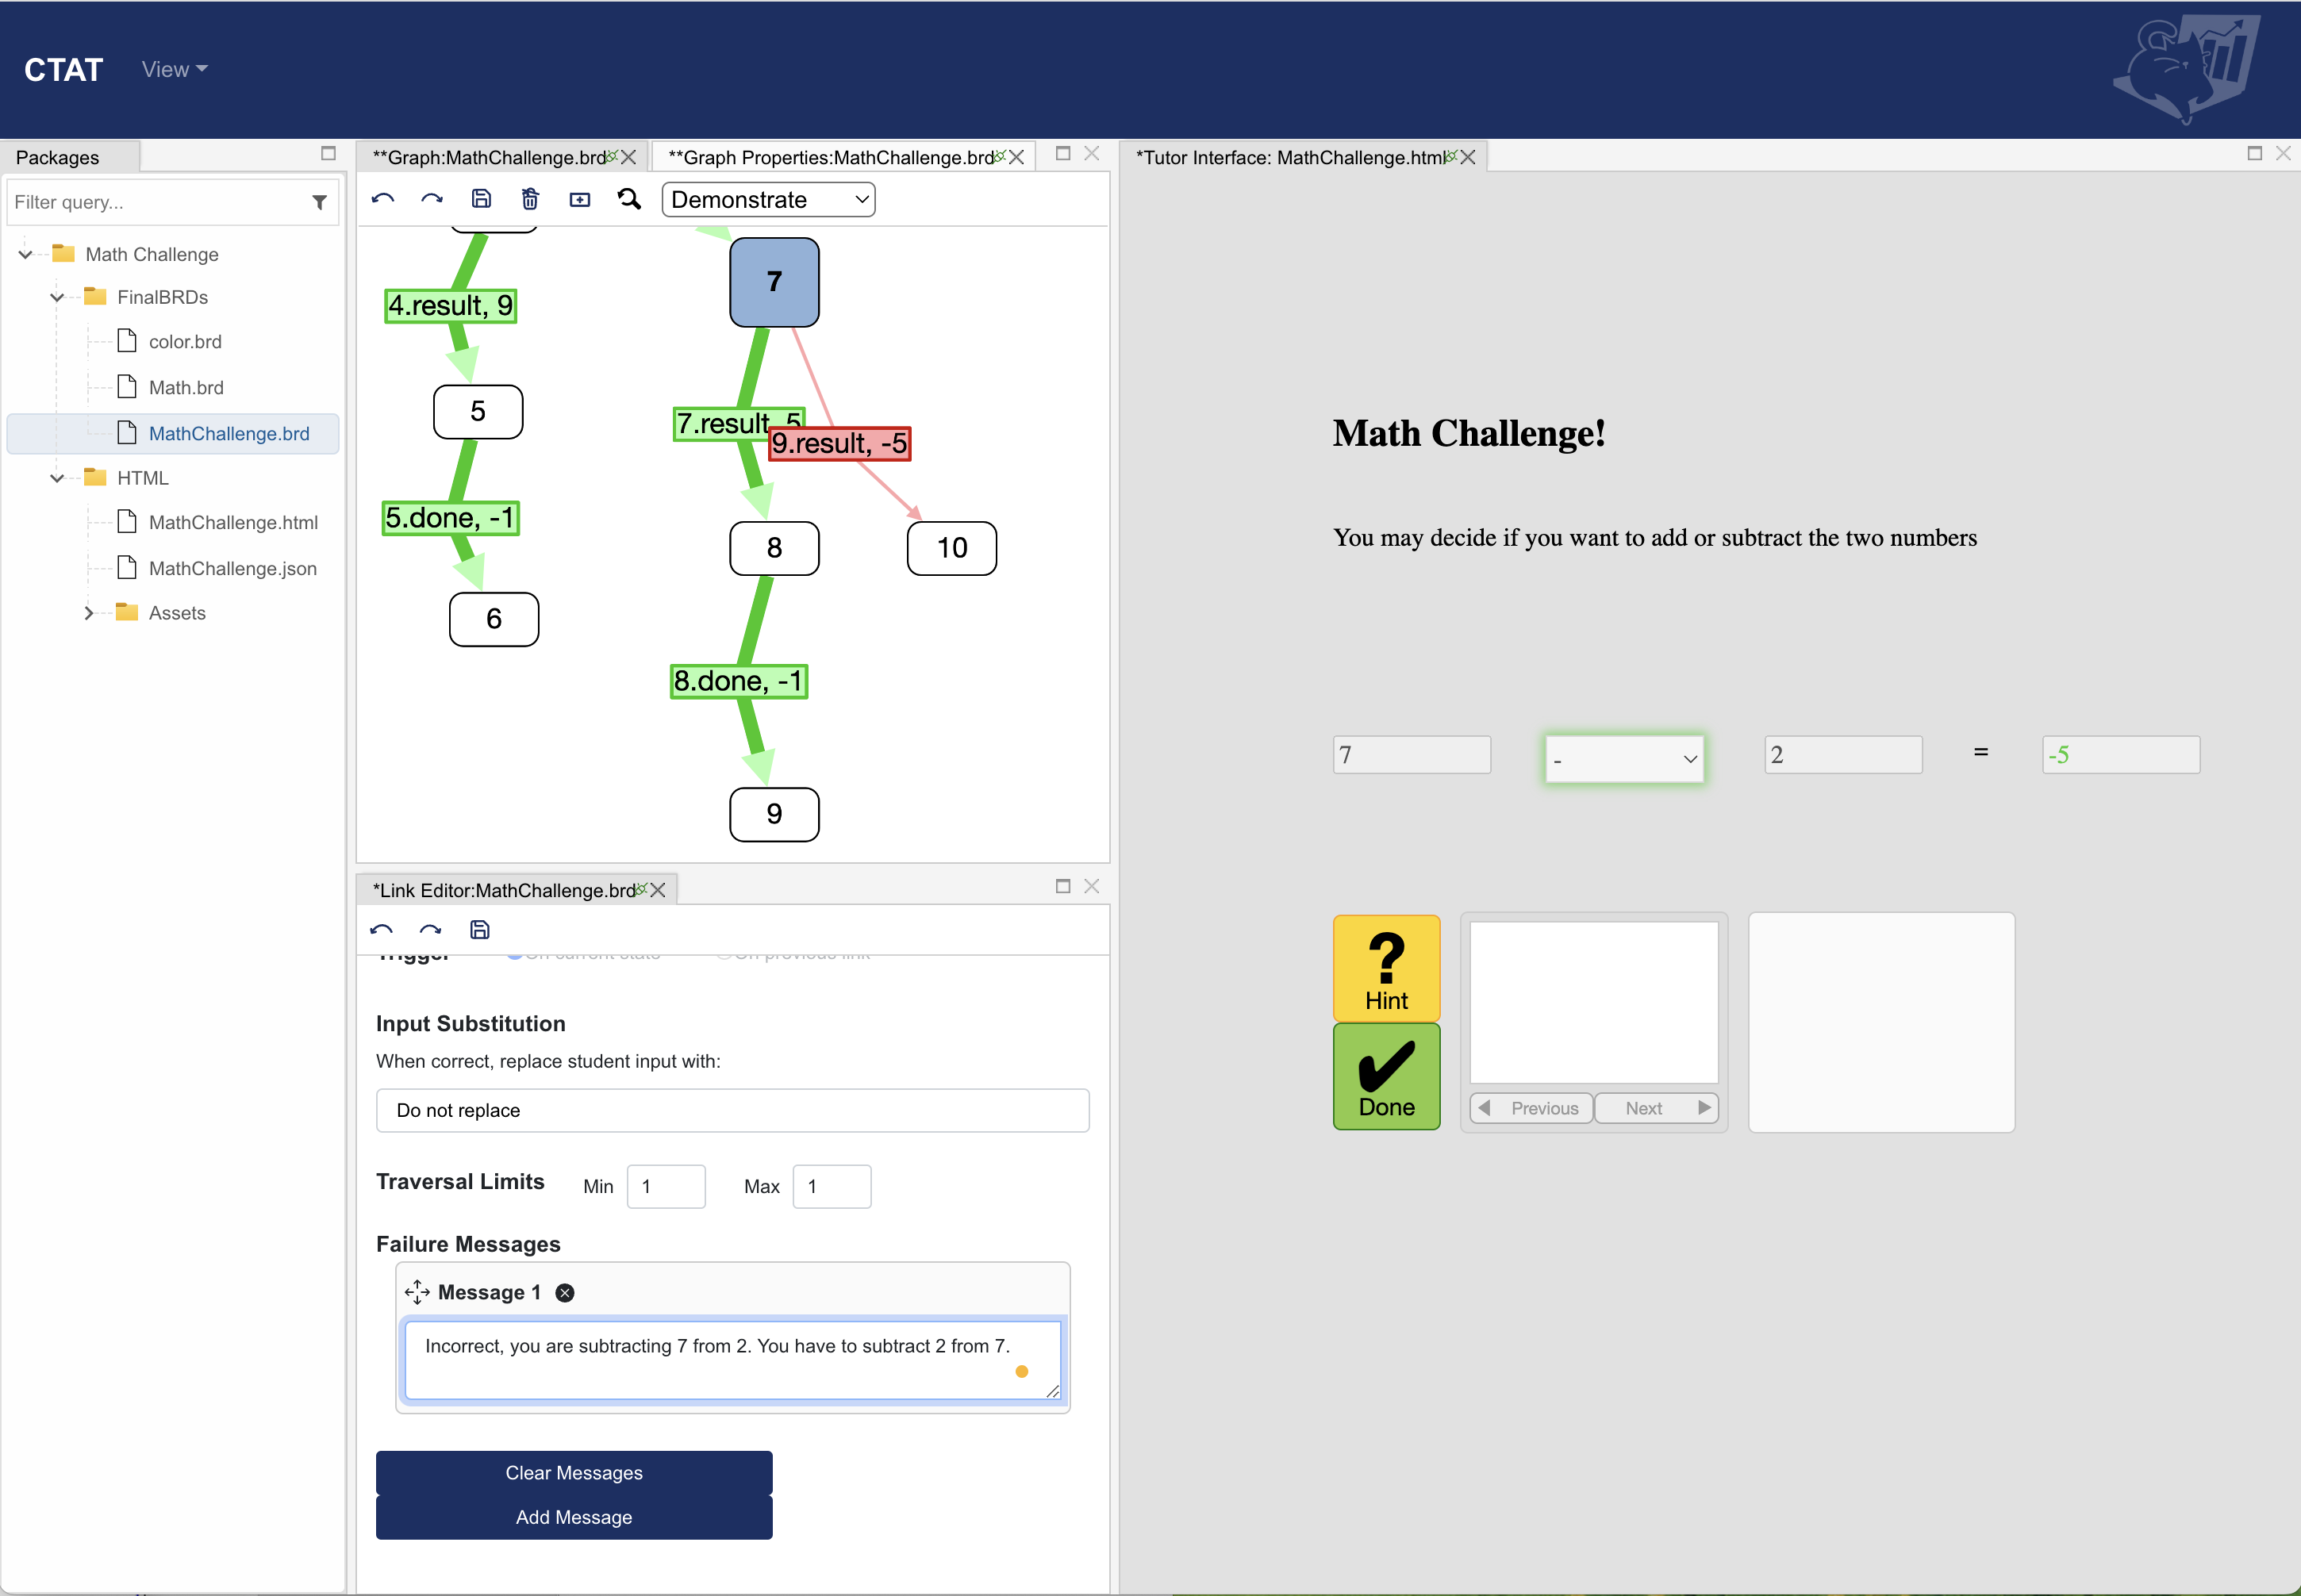
Incorrect Action (Bug): An incorrect action. This type of link is not traversed when matched. As one cannot progress through an incorrect action link, it is not possible to have links beyond an incorrect action link. This type of link can have a single bug message that is displayed to the student when they perform the incorrect action specified on the link. Visual feedback to the student is commonly a red outline or red text on the component specified as the selection of the incorrect action.
In general, any student input that is not recognized by the tutor is marked as incorrect; but by defining incorrect steps in the graph, the tutor will be able to provide a customized error feedback message for the specified input.
Error feedback messages are generally defined for common student misconceptions. In the Math Challenge tutor let’s assume we discovered one common misconception that a student selects “-” and ends up subtracting 7 from 2 instead of the other way. We can go back to node 7 in the behavior graph by double clicking on it and performing a step on the interface by writing “-5”. Then label it as an incorrect action from the link editor menu and write a buggy message.
CTAT allows for five feedback policies, to learn more about them click here: How to manage feedback.mp4
Steps in a behavior graph can be either student-performed or tutor-performed. While a student-performed step specifies behavior the student should perform while using the tutor, a tutor-performed step specifies an action that the tutor software will perform on the interface. Tutor-performed steps are therefore powerful links that can be used to complete problem-solving steps, make changes to the student interface such as hiding or showing a widget, or perform other actions that you specify.
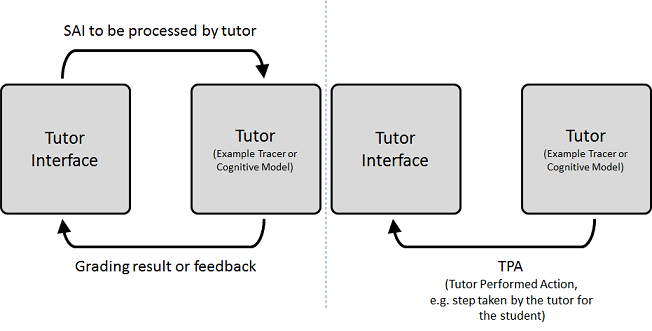
You can use tutor-performed actions for steps that cannot be demonstrated, such as hiding, locking, and highlighting widgets, and for configuring the initial settings of a component (e.g., CTATNumberLine) at the beginning of a problem.
The “Any” actor can be used for evaluated steps that either the student or tutor can perform.
For example, if you want the Math Challenge tutor to act as a calculator you can change the actor of the step after selecting the operator to Tutor (unevaluated). In this case, the student only has to select + or - and the tutor will do the calculation for them.
TPAs can also be used to make a component visible or highlight it. Thus, in complex problems, students can be successively shown what step to work on next. This progressive disclosure is particularly relevant when the activity is more instructional or introductory. It can reduce extraneous processing that causes cognitive overload for students. However, a TPA can be used ineffectively, as “over-scaffolding”, when there are decisions about step ordering that students ought to be learning and practicing themselves. In this case, the TPA is removing essential processing and harm learning.
Getting Started
Using CTAT
HTML Components
- HTML Examples
- CTATAudioButton
- CTATButton
- CTATChatPanel
- CTATCheckBox
- CTATComboBox
- CTATDoneButton
- CTATDragNDrop
- CTATFractionBar
- CTATGroupingComponent
- CTATHintButton
- CTATHintWindow
- CTATImageButton
- CTATJumble
- CTATNumberLine
- CTATNumericStepper
- CTATPieChart
- CTATRadioButton
- CTATSkillWindow
- CTATSubmitButton
- CTATTable
- CTATTextArea
- CTATTextField
- CTATTextInput
- CTATVideo
