db.sqlite3삭제migrationfile 삭제
python manage.py showmigrationspython manage.py makemigrations$ python manage.py sqlmigrate articles 0001
[app_label] [migration_name]
BEGIN;
--
-- Create model Article
--
CREATE TABLE "articles_article" ("id" integer NOT NULL PRIMARY KEY AUTOINCREMENT, "title" varchar(140) NOT NULL, "content" text NOT NULL, "created_at" datetime NOT NULL, "updated_at" datetime NOT NULL);
COMMIT;$ python manage.py migrate
[app_label] [migration_name]생성을 위해서는 아래와 같이도 할 수 있다!
Article.objects.create(title='제목', content='내용')-
fd
article = Article(title='제목', content='내용')
article.save()
: This exception is raised when the relational integrity of the data is affected.
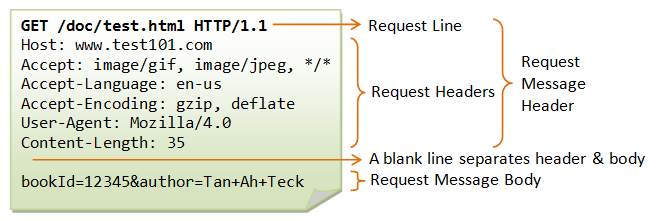
- GET
- data를 가져오다
- 특정 리소스의 표시
<a>tag<form>tag 및 브라우저에서 주소창을 보내는 요청 등URL을 활용 (querystring) 하여 data를 전송함- 크기 제한 & 보안 이슈가 있음
- POST
- data를 게시하다
- 특정 리소스에 제출 (서버의 상태 변화)
- 보통 HTML
Form을통해 서버에 전송하며, 서버의 변경사항을 만듦 - HTTP 요청 메시지의
body에 data를 전송함
- Resource를 가져올 수 있도록 해주는 protocol
- 웹에서 이루어지는 모든 교환의 기초
- URL (Uniform Resource Locators)
- Web에서 정해진 유일한 자원의 주소
- 프로토콜 :// 도메인: 포트/ 경로(path)/?파라미터#앵커
views.py 수정
def create(request):
    article = Article()
    article.title= request.POST.get('title')
    article.content = request.POST.get('content')
    article.save()
return redirect(f'/articles/{article.pk}/')<form action="/articles/create/" method="POST">
{% csrf_token %}
</form>hidden 값으로
csrf token이 추가되어 있는 것 확인 가능
curl -X GET http://chloecodes1.pythonanywhere.com/community/설치
sudo apt-get install telnetdrequest 날리기
telnet google.com 80urls.py
from django.urls import path
from . import views

app_name = 'articles'

urlpatterns = [
    # /articles/
    path('', views.index, name='index'),
    path('new/', views.new, name='new'),
    path('create/',views.create, name='create'),
    path('<int:pk>/',views.detail, name='detail'),
    path('delete/<int:pk>/',views.delete, name='delete'),
    path('edit/<int:pk>/', views.edit, name='edit'),
    path('update/<int:pk>/', views.update, name='update'),
]
views.py
from django.shortcuts import render, redirect, get_object_or_404
from .models import Article

# Create your views here.

def index(request):
    articles = Article.objects.all()
    context = {
        'articles': articles
    }

    return render(request, 'articles/index.html', context)

def new(request):
    return render(request, 'articles/new.html')

def create(request):
    article = Article()
    article.title= request.POST.get('title')
    article.content = request.POST.get('content')
    article.save()

    # return redirect(f'/articles/{article.pk}/')
    return redirect('articles:detail', article.pk)


def detail(request, pk):
    article = Article.objects.get(id=pk)
    context = {
        'article':article
    }
    return render(request,'articles/detail.html', context)


def delete (request, pk):
    article = Article.objects.get(id=pk)
    article.delete()

    # return redirect(f'/articles/')
    return redirect('articles:index')


def edit(request, pk):
    article = get_object_or_404(Article, id = pk)
    context = {
        'article': article
    }

    return render(request, 'articles/edit.html', context)

def update (request,pk):
    article = Article.objects.get(id=pk)
    article.title = request.POST.get('title')
    article.content = request.POST.get('content')
    article.save()

    return redirect(f'/articles/{article.pk}/')
In html
<a class="navbar-brand" href="{% url 'articles:index' %}"> ... </a>

<a href="{% url 'articles:delete' article.pk %}"> ... </a>

<form class="form-inline" action="{% url 'articles:search' %}" method="POST"> ... </form>article = Article.objects.get(id=pk)
-
get( ) 은 값이 없으면 error를 띄움
- 단 하나를 return하는 method
-
그래서 사용하는 것
from django.shortcuts import render, redirect, get_object_or_404
 ...
article = get_object_or_404(Article, id=pk)
settings.py
# servering 되는 URL 앞에 붙음
STATIC_URL = '/static/'

# app directory 가 아닌 static 폴더 지정
STATICFILES_DIRS = [
    os.path.join(BASE_DIR, 'static')
]
+
TraceRoute- Linux /TRACERT- Windows
지정된 호스트에 도달할 때까지 통과하는 경로의 정보와 각 경로에서의 지연 시간을 추적하는 명령이다, 쉽게 경로 추적 툴이라고 볼 수 있다 (ICMP을 사용한다!)
-
지정된 호스트에 도달할 때까지 통과하는 경로의 정보와 각 경로에서의 지연 시간을 추적하는 네트워크 명령어로 특정 사이트에 접속이 되지 않거나 지연이 있는 경우 어디에서 병목이 발생하는지를 알아보는데 유용함.
-
접속이 되는 각 경로를 체크하여 **어느 경로(Routing)**를 거쳐 접속이 되고, 어느 구간에서 얼마만큼의 속도 지연이 있는지, 그리고 어디에서패킷이 중지 됐는지를 확인할 수 있음
-
단, 시간대/내부 트래픽/서버 상태 등의 많은 영향을 받아 값이 달라질 수 있으므로 반복 확인이 필요하다!
Install traceroute
sudo apt-get install tracerouteUse traceroute
$ traceroute www.google.com
traceroute to www.google.com (172.217.31.164), 30 hops max, 60 byte packets
 1  _gateway (172.30.1.254)  5.195 ms  5.127 ms  5.105 ms
 2  220.78.3.1 (220.78.3.1)  5.071 ms * *
 3  125.141.249.21 (125.141.249.21)  5.364 ms  5.308 ms  5.262 ms
 4  * * *
 5  * * *
 6  112.174.73.178 (112.174.73.178)  6.510 ms 112.174.47.162 (112.174.47.162)  5.301 ms 112.174.73.178 (112.174.73.178)  4.858 ms
 7  74.125.52.16 (74.125.52.16)  31.913 ms  31.801 ms  33.951 ms
 8  108.170.242.129 (108.170.242.129)  36.142 ms 108.170.242.97 (108.170.242.97)  34.386 ms  34.811 ms
 9  209.85.253.109 (209.85.253.109)  36.711 ms  36.555 ms  36.483 ms
10 nrt12s22-in-f4.1e100.net (172.217.31.164) 34.998 ms 33.267 ms 32.844 ms- model driven design
- data modeling


